The positive news is, the engine is now running again, with a new raw water pump and a new alternator regulator and new brushes. On the minus side, I'm still a bit stiff from laying in the lazarette with my legs bent back over my head.
I first replaced the old raw water pump with a new one. I was never too happy with the pump as it required constant attention, adjustment, grease and it still dripped salt water from time to time. So I enquired into replacements and learned that a new, identical pump was hugely expensive and I'd still have an old design.
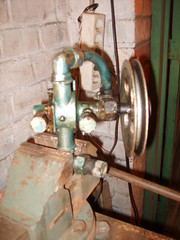 the old pump aka "grease guzzler"
So I tried to find alternatives and the people at ASAP got me a Johnson pump which required minimal adjustments. The new pump did have slightly different measurements, mostly to do with the entry and exit being 3/4 inch instead of 1/2 inch. So I got some basic connections from my local plumbing supplier. I had the pulley machined to a slightly larger bore (1 mm extra) and I now have a brand new, non leaking pump.

Once this was finished, the engine would run so I could continue work on the engine alternator.
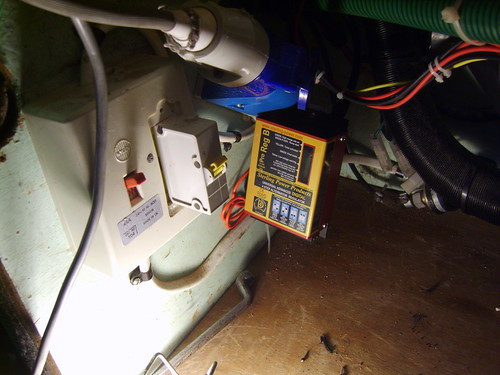
I had ordered the Sterling advanced alternator regulator as I had experienced I never got the service batteries quite to 100% full. The shore power charger is a 10A DIY jobbie which is good at topping up, but it never really bulk charges or deliver the final charge modern chargers can. A new shore charger is on the wish list, but not that high as we'll be spending a year away from marinas, so shore power availability will be limited.
The engine alternator is 35 Amps, and as long as we motor for several hours and the battery state is not too badly discharged, it has the capacity to keep the batteries topped up. But the in-built regulator is a simple device, and as the batteries got older, charging them got more difficult and lengthy, even when motoring for longer spells.
I would have preferred a heavier alternator, but that would have meant a different pulley set-up. And I just bought 270 Watts in solar panels, so any alternator power would be an extra. The main thing is getting the batteries charged as rapidly as possible with the existing one. So I got the regulator as it promises to use all 35 Amps in bulk setting.
I installed the regulator, which meant disconnecting the alternator twice while doing checks and adjustments between them.
After taking the alternator out, I checked for wear and found a brush needed replacement. It took an alternator builder two weeks to get the Lucas brushes from Italy. I then connected check wires to the brushes. They are the yellow wires in the picture.
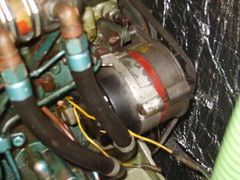
I could determine that the alternator has - as I suspected - negative coil field control. This is important to adjust the settings of the regulator.
I took the alternator out after running the engine and connected the wires as described in the Sterling manual. It's pretty clear from the little booklet how to do this, but the warnings are sometimes a bit dramatic for a technically challenged mechanic such as myself.
I tend to think for long periods, all the while staring at whatever device I'm tinkering with, hoping there isn't anything I've mysteriously overlooked. In the case of the water pump, this was a good thing. I almost forgot to tighten two hose clamps on the exit side of the pump, which would have given a nice anti freeze solution shower. Thinking long and hard while looking at the pump made me hand check all clamps, just before trying the engine.
In the case of the regulator, the warnings made me re-check everything I did, even though I got it right from the start. But after spending hours in the cramped lazarette, I finally started the engine, and behold! It worked perfectly.
The lazarette isn't actually that cramped as lazarettes go, but laying flat on your belly in one isn't the way they're meant to be employed. It might serve as a nice pilot berth, but I think I'll stow it with all the extra gear we'll have along. It'll do perfectly and I won't have to lay in it anymore. I'll use the soft bed in the aft cabin. I think I'll buy a new mattress to make it even more comfortable. And a large fan for those hot evenings in the Caribbean.